G-rar Posted November 29, 2011 Report Share Posted November 29, 2011 Hi guys, Yesterday (28-11-2011) I have been busy making myself a Fam36 (famas with a G36 toprail) This is a tutorial on how I have Mounted the G36 toprail to my famas upper. Note this is a guide on how I have done it! There are other and maybe better ways to do it! Any advice/tips are welcome to improve the build. Whenever I change something, I will post it in this topic! -- Ok, lets get started -- Things I used: Parts for the gun: Famas Upper G36 top rail Aluminium plates (2) Wooden block Screws, bolt screws Tools for the job: Screwdrivers (Cross and flat) Figure saw File ---------------------------------------------------------------------------------------------------------------------------------------------------- Part 1: Disassembly of the upper part Follow these steps to remove the upper part of the famas: 1.1 Unscrew Carry handle screw 1.2 Unscrew front sight post 1.3 Remove front sight post 1.4 Unscrew cable retainer 1.1 Unscrew carry handle screw 1.2 Unscrew front sight post 1.3 Remove front sight post 1.4 Unscrew cable retainer Result Link to post Share on other sites
G-rar Posted November 29, 2011 Author Report Share Posted November 29, 2011 Part 2: Modifying the upper 2.1 Cut off the carry handle 2.2 Screw a wooden block in the G36 top rail 2.3 Use the aluminium plates to connect upper with rail 2.4 Remove rear sight 2.5 Cut off front sight 2.1 Cut off the carry handle Make sure you file everything till its soft 2.2 Screw a wooden block in the G36 top rail 2.3 Use the aluminium plates to connect upper with rail 2.4 Remove rear sight 2.5 Cut off front sight Link to post Share on other sites
G-rar Posted November 29, 2011 Author Report Share Posted November 29, 2011 Part 3: The reassembly Follow the desassembly backwards! I also added a small G36 rail on the side YET TO COME: Magpul BUIS Eotech or T1 micro dot (not sure yet) Anpeq Link to post Share on other sites
faramon Posted November 29, 2011 Report Share Posted November 29, 2011 Not sure if I would make one myself but it does look pretty cool! Well done and a nice guide Link to post Share on other sites
G-rar Posted November 29, 2011 Author Report Share Posted November 29, 2011 Thanks faramon! Link to post Share on other sites
notrabies Posted November 29, 2011 Report Share Posted November 29, 2011 I'm not the biggest fan of the FAMAS, but I do like the look of it more now. I think It could be a bit better looking with the default G36 iron sights on the rail as well. Link to post Share on other sites
The Bushman Posted November 29, 2011 Report Share Posted November 29, 2011 Nice Job. I made a similar conversion, years ago, for someone. They loved it. I used steel plates and just a rail from the FAMAS scope mount. The G36 hadn't been released back then. Edit: Which FAMAS threaded muzzle is that and where is good to source it? Good Hunting Link to post Share on other sites
Road_Dancer Posted November 29, 2011 Report Share Posted November 29, 2011 I'm not the biggest fan of the FAMAS, but I do like the look of it more now. I think It could be a bit better looking with the default G36 iron sights on the rail as well. Famas SD front quarter by road_dancer, on Flickr Like this? Link to post Share on other sites
G-rar Posted November 29, 2011 Author Report Share Posted November 29, 2011 I think It could be a bit better looking with the default G36 iron sights on the rail as well. My BUIS are still being shipped to me, whenever I recieved them, I will upload a new picture Edit: Which FAMAS threaded muzzle is that and where is good to source it? Its a silencer adaptor. I bought it on EhobbyAsia You have CCW en CW: CCW: http://shop.ehobbyasia.com/king-arms-silencer-adaptor-for-fa-mas-14mm-ccw.html CW: http://shop.ehobbyasia.com/king-arms-extension-adaptor-fa-mas-cw.html @ Road dancer: Thanks for the pic! This can be usefull for other people who also like this mod! Link to post Share on other sites
notrabies Posted November 29, 2011 Report Share Posted November 29, 2011 Famas SD front quarter by road_dancer, on Flickr Like this? Yeah, that's exactly what I was thinking of, without those sights the rail looks too thin and plain for my tastes. Link to post Share on other sites
Paleblue Posted November 30, 2011 Report Share Posted November 30, 2011 What if you put a G36 scope on it? I think it's exceptionally smexy. Link to post Share on other sites
G-rar Posted December 5, 2011 Author Report Share Posted December 5, 2011 Still waiting for the accessoires ! Meanwhile a little teaser ! http://www.youtube.com/watch?v=7NPNPm1-lv4 Link to post Share on other sites
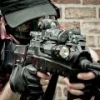
G-rar Posted December 16, 2011 Author Report Share Posted December 16, 2011 Again a quick update: Iron sights and Anpeq came in .. now I know how much place there is left for a reddot.. I guess it's going to be a Microdot ^^ Link to post Share on other sites
sigma3 Posted December 16, 2011 Report Share Posted December 16, 2011 Badass. Does it bother you that your laser is completely blocked, though? Because it bothers me. Link to post Share on other sites
G-rar Posted December 16, 2011 Author Report Share Posted December 16, 2011 Badass. Does it bother you that your laser is completely blocked, though? Because it bothers me. hehe, indeed, that needs to change ^^ Link to post Share on other sites
G-rar Posted January 18, 2012 Author Report Share Posted January 18, 2012 How my bb looks now Link to post Share on other sites
Zatarra Posted January 23, 2012 Report Share Posted January 23, 2012 sorry to hijack this thread, but can someone point me in the direction of a 9.6volt battery that will fit the TM famas? thanks Link to post Share on other sites
WhiteHawksan Posted January 24, 2012 Report Share Posted January 24, 2012 any 9.6v Mini will fit in the handguard with oodles of room to spare. You could also use a 7.4v LiPo, I'd recomend the Turnigy Nano Brand from Hobby King. You won't have to worry about space as a famas has oodles of room in the hanguard. Link to post Share on other sites
G-rar Posted February 2, 2012 Author Report Share Posted February 2, 2012 sorry to hijack this thread, but can someone point me in the direction of a 9.6volt battery that will fit the TM famas? thanks It depends on what type you will use. The TM famas comes with large tamiya connectors. Normally a 8.4v large type is already a tight fit in that handguard! (no space left) So a 9.6v large type will NOT fit! I just ordered XT60 connectors to replace the large tamiya's.. I'm planning to run a 9.6v mini type or a 7.4v lipo 15c (after I changed the connectors to xt60 offcourse ^^). Link to post Share on other sites
G-rar Posted February 3, 2012 Author Report Share Posted February 3, 2012 Ok guys, just painted my famas. Here are the results! Thanks to boomheadshot (infidel) for the tutorial http://www.arniesairsoft.co.uk/forums/index.php?/topic/195808-how-to-get-the-afghan-and-back-look/ Pictures: Link to post Share on other sites
W1dget Posted February 3, 2012 Report Share Posted February 3, 2012 Wow, that looks *fruitcage* amazing. Unfortunately being a french gun every fire mode is safe, isnt it? Really, top notch work. Prefer that to the millions of operator looking m4's done out there! Link to post Share on other sites
G-rar Posted February 4, 2012 Author Report Share Posted February 4, 2012 Thanks W1dget ! Link to post Share on other sites
Murdoc Posted February 4, 2012 Report Share Posted February 4, 2012 Looks really good!!! Link to post Share on other sites
HJA1512 Posted February 4, 2012 Report Share Posted February 4, 2012 Agreed, nicely done. Link to post Share on other sites
G-rar Posted February 20, 2012 Author Report Share Posted February 20, 2012 Here's a video on the paintjob, linked also to the topic on Arnies Airsoft http://youtu.be/qC7zFs5X-9U Link to post Share on other sites
Recommended Posts
Archived
This topic is now archived and is closed to further replies.