|
|

SHADOW? The review below is of SHADOW’s custom built Maruzen APS-2 SV. Barry Saitta, who is a machinist by trade, but does all of the upgrades on SHADOW’s airsoft weapons, built it for SHADOW. SHADOW wanted the rifle to be reliable and durable with no worries of gun breakage, it needed to be able to achieve good range, so he could engage targets at long distance. He also wanted it to be accurate at these long distances, but most of all he wanted it to be silent, so with that in mind Barry set off to build the APS-2 SV “SHADOW”.
 Picture of stock Maruzen APS-2 SV |
Everything from heavier rated springs, gas bolt kits, tight bore barrels, adjustable hop-ups, and reinforced trigger mechanisms. You can mount just about any scope to the rifle, and there is a weaver-type mount already on the rifle, you can even attach a bi-pod to the rifle.
Out of the box, it has decent power and range, but to get the full potential of the rifle, you’ll need to upgrade it. The rifle has a fixed hop-up that is said to be set for the Maruzen .29g Grand Master BBs. You can also attach a silencer to the rifle, which makes the rifle very appealing, and let’s not forget about the ORCA stock. So, as you can see the APS-2 SV have quite a big variety of parts available and can be made into a very good sniper weapon. That is probably why the rifle is so commonly used and is so popular with airsoft snipers. So, with all that out of the way, let’s get on with SHADOW’s review of his custom built APS-2 SV “SHADOW”.
So why an APS-2 SV? When I first purchased the Maruzen APS-2 SV, I was looking to just replace my PDI M24 SOCOM. It was stolen from me (by a stroke of luck I got it back) so I was looking to get another M24, but none of the on-line airsoft retailers had any in stock at the time. One of the retailers told me about the Maruzen APS-2 SV and that he had one in stock, I had read and saw pictures of the APS-2 SV and was really not that impressed with it. But, I needed a bolt-action sniper rifle and I needed one quick, so I decided to go ahead and get the APS-2 SV. I thought once I was able to get an M24, I could just sell the APS, Wrong! I totally fell in love with the rifle and now I use it 90 to 95% of the time. The rifle is so versatile, has so many upgrade parts, and accessories you can just about build the best sniper weapon with it, and when upgraded the performance will surprise you.
Out the box: Stock the APS-2 SV right out of the box is not a bad rifle, I never chrono’d my APS when it was stock, but it has been said. That the rifle in stock form can/will shoot in the range of 275 to 300 fps and maybe a little over, if I had to guess I would assume that to be a close guess on it’s velocity. The range of a stock APS-2 SV is pretty good and with the right conditions you could easily make shoots out to 55-60 yards, the accuracy may not be there, but you’ll hit the target.
For looks the APS-2 SV is not up to par with the PDI M24 SOCOM or some of the other sniper rifles that are out. The M24 is just a beautiful weapon to look at, has way more realism to it, and the APS-2 SV looks more toyish but it can be improved upon. The APS-2 SV is also very light in weight compared to the M24, that’s not necessarily a bad thing, if you don’t want a heavy weapon then the APS-2 SV is a good choice.
As for the stock internals, the APS-2 SV isn’t as durable as the M24, the APS-2 SV’s stock piston and spring guide are plastic whereas in the M24 they are metal. You can upgrade the APS-2 SV to make it powerful as much as you can with an M24; the APS-2 SV comes with a fixed hop-up, set for Maruzen .29g Grand Master BBs. I did try these BBs and find them to be a bit light even when stock, some have said that the .3g BBs work better, and some have said the .33g work better. I personally think that the .36g BBs work the best, that is pretty much all I use in the rifle. I have used the .43g BBs, but they seemed to be a bit heavy for a stock APS-2 SV. I highly recommend to anyone planning on purchasing an APS-2 SV to experiment with the different weight BBs out there on the market.
 The custom built silencer mounted on SHADOW’s APS-2 SV. |
One of the things that also appealed to me about the APS-2 SV is the fact that you could attach a silencer to the rifle. At the time when I purchased the rifle there were no silencers available or they were hard to find, now you can get one and have a few choices to pick from. I had a silencer built for me by a local machine shop; it was made of aluminum and didn’t really silence the rifle. It was more for looks; the only problem was even though it was made of aluminum, it was still pretty heavy on the rifle.
The existing threads in the barrel of the rifle where the stock flash hider is attached were kind of light duty, and I was worried that a silencer would damage the threads, so I rarely left the silencer on the rifle for long periods of time
One other problem with the APS-2 SV is it is short in length, or at least for me it is (unlike the M24 that has an adjustable stock). The APS-2 SV does have an adjustable stock, but you can only make it shorter by removing one or more of the spacers for the butt plate. For taller people or anyone with longer reaches, the APS- 2 SV needs to be lengthened, this is an easy fix and all it requires is making or getting additional spacers for the butt plate.
Let the APS-2 surgery begin! Now that I have went through my impressions of the APS-2 SV in stock form, I will tell you what I have had done to mine to make it a formidable sniper weapon system. The plan was to build a sniper weapon that had good range, so I could engage my targets at long distance. It would also need to be accurate at the distances that I wanted or would be engaging my targets, but I also wanted a silencer for it that functioned, and so that I didn’t have to worry about it damaging the rifle. So, with all that in mind I turned the ideas and rifle over to a friend of mine. Who is a machinist by trade and does all upgrades on my airsoft weapons, his name is Barry Saitta, and I want to give him all the credit for building and designing the rifle. Now known as the APS-2 SV “SHADOW”, without his expert skill with fabricating parts, and his knowledge of what upgrade would best give me what I wanted. The rifle you see pictured in this review would not have been possible without him, so I would like to thank him here for all his hard work and time.
The guts: I’ll start with what Barry did to upgrade the internals of the APS-2 SV, but before I do I’ll tell you what it was upgraded with, before she was transferred into the APS-2 SV “SHADOW”. When I received my APS-2 SV for the first time, it didn’t stay stock for long, I knew that to be reliable, durable, accurate and consistent the APS-2 SV would need to be upgraded so a PDI 200% spring, a PDI steel spring guide, PDI V3 vacuum piston, cylinder and a steel trigger mechanism was installed. The rifle shot 400 fps and was quite accurate I was going to stay with the upgrade parts that I had and only add a tight bore barrel. After discussing this with Barry, I decide to go ahead and upgrade the internals again.
Here is what the APS-2 SV “SHADOW” is now upgraded with. It currently features a PDI 300% spring, PDI steel spring guide, PDI L2 cylinder set with V3 vacuum piston, taper cylinder head, and an OK 6.03mm inner barrel cut to length. The steel trigger mechanism that was installed in the early upgrade will remain in the rifle as it will now be needed to handle the 300% spring, as of right now the bolt handle is stock but it will probably be upgraded with a FIRST reinforced bolt handle later. Just to be on the safe side, don’t want the bolt handle snapping off at the wrong moment with these internal upgrades, the APS-2 SV should shoot 500 fps, giving me good range and accuracy. You can read the test results on how the rifle performed farther on down the review.
 Before picture of SHADOW’s Maruzen APS-2 SV |
 After picture of the Maruzen APS-2 SV “SHADOW” |
'Beauty is in the eye of the owner...' For the cosmetics to give the APS-2 SV “SHADOW” it’s awesome looks, as you can tell it basically looks the same as it did in the before picture, only it has a silencer and the sun shade for the scope has been added to it in the after picture. I’ll start with the silencer it does function and silences the rifle quite nicely, you do still hear the “tang” of the piston hitting, but the sound of the expelling air is virtually silenced. The silencer is made of T-6 6061 aircraft aluminum that is very light, extremely strong, and was the best material to make the silencer from.
 Custom built silencer is 15-3/8” in length. |
 Business end of the custom silencer. |
The stock length of the inner barrel is 400mm and the plan called for the outer barrel to be lengthened to 24” with silencer attached. Barry and I both decided that to get better range, it would be best to lengthen the inner barrel, and being that the outer barrel with silencer attached would be a full 24”.
The inner barrel was going to have to be lengthened too, so an OK 6.03mm inner barrel was purchased, the OK inner barrel is 599mm in length, and so it would need to be precisely cut down to 522mm. A full 122mm longer then the stock length of 400mm, the inner barrel would extend all the way to the end of the silencer.
A plug was made from a piece of solid plastic rod, and a hole big enough for the inner barrel to fit through was precisely drilled in the center. This plug was inserted into the existing outer barrel to help hold the new longer inner barrel in the center, and it would also help in the prevention of barrel wobble.
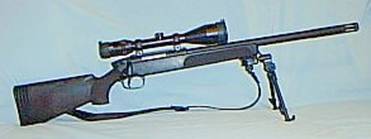
 The custom-built Maruzen APS-2 SV “SHADOW” |
The silencer was going to be an extension of the outer barrel, so to attach it securely to the outer barrel the outer barrel would need to be equipped with outer threads, so the silencer could be threaded on to it. This was done with a thread cutting tool, and was a pain-staking, nerve-racking process from what I was told. The threads would have to be prefect and match with the threads in the inside of the silencer, where it threaded down onto the outer barrel.
Once, this was done the internals for the silencer was constructed, if you remember at the beginning of the review, I stated that I wanted the silencer to function. So, to do this a baffle with sections or spaces was built and then each section or space were wrapped individually with fiberglass insulation, and then the whole length had foam cell insulation pulled over it. The silencer is 15-3/8” in length and 5-¼” in diameter measured across it‘s 44mm, the end plates are made of 1/16” aluminum flat plate and the rear plate had a piece of aluminum hollow tubing milled down to just a shade under 1” welded to the inside of the rear plate. Which was cored in the center so it could slide over the outer barrel and the interior of the aluminum hollow tube was tapped with threads.
The rear end plate was stamped with a special stamping tool and press to get it it‘s shape, the front plate was drilled in the center and is what will be the exit hole for the BB coming out of the inner barrel. Measurements were critical and needed to be precise so measurements were checked, re-checked, and then checked a third time. Both end plates were welded on the main body of the silencer. Then a whole lot of grinding and sanding on the weld marks to make them smooth and unnoticeable was done. Once, the silencer was completed it was cleaned, prepped, primed, and then painted flat black to match the rest of the rifle.
 BlackHawk Industries Tactical Eye Relief Cheek Pad |
Onto that stock... Now, that the silencer was completed the focus was turned to the stock and as I said, at the beginning. The APS-2 SV is short in length or at least for me it is and for taller people or anyone with a long reach, will/might have some problem with that. Either getting additional spacers for the butt plate or making your own spacers can easily fix this. I did try to make my own spacers, as I could not find anywhere to buy additional spacers for the rifle. Some of you might be thinking why didn’t I get the ORCA stock and I’ll reply with I just didn’t like the way it looked. After, looking at it at varies websites on APS-2 SV, it just didn’t appeal to my taste.
To add some weight to the APS-2 SV, which will help stabilize the rifle when you are setting up for a shot Barry filled the hollow stock with expanding foam that he sprayed into the stock, and once it set up he cut and filed any excess foam off. This was done before the butt plates were installed and it did add a little more weight to it, and it made the stock feel more solid too. This was done with the barrel assembly removed off of the stock, and caution should be taken as to not get any foam pass the rear part of the trigger guard. I also added a BlackHawk Industries, Tactical Eye Relief Cheek Pad to help raise my line of sight, so my eye is even with the scope and it helps with aiming due to the low profile of the APS-2 SV’s stock. You can get one of these cheek pads for about $20.00 from www.blackhawkindustries.com.
FPS limits and all: Being that the team I am on has a set limit of 500 fps with .2g BBs on all sniper weapons with a minimum engagement range of 70 ft. there was no reason why not to bump it all the way up to the limit. So, the barrel assembly was disassembled, cleaned, and the new upgrades were installed. A new PDI 300% spring to replace the existing 200% spring, PDI L2 cylinder with V3 vacuum piston, taper cylinder head, steel spring guide, and the new tight bore inner barrel was fitted into place. The K2 steel trigger box was kept, as it would now be needed to handle the 300% spring.
The bolt handle is stock and should be able to handle the heavier spring, but later it will be replaced with a FIRST reinforced bolt handle, just to be on the safe side. I would experiment again with the different weight BBs to see what would be best for the new upgrades, but more then likely I would stay with the .36g BBs. If I do find out that a lighter or heavier BB will work better then I will use those, but I have had great success with the .36g BBs and they seem to be the good happy medium for the fixed hop-up that I was looking for.
The other accessories that you see on the rifle I pretty much just stayed with what I was originally using. Hey! If it ain’t broke, don’t fit it. Right? ^_^ So, starting with the bipod that is mounted on the front of the stock. It is the Versa-Pod bipod and you can get one from www.tapco.com for about $60.00. The reason why I decided to go with the Versa-Pod bipod is for the fact that it had fully adjustable legs with a maximum lift of 11-1/4” and a minimum lift of 8”. It can be quickly detached and attached with just a push of a button to lock and unlocked the bipod. The adaptor stays in place and can be used as a small handgrip, allowing more comfortable shooting and better control; it also has a sling swivel with push-button sling release.
 Bipod To mount the Versa-Pod bipod all you need to do is just remove the barrel assembly, place the mounting adapter for the bipod as far forward to the front of the underside of the stock, center it on the stock, and with a center punch, make a index mark. Now, drill a hole through the stock where you made the index mark the same size as the mounting bolt, you will need to get a slightly longer bolt and if you can’t find one that is quite long enough. Just go with the one that is closest and you can use washers as spacers or shims. Then all you need to do is tighten up the bolt, but don’t tighten it to tight, or you could crack the stock. It is plastic... remember? One of the features that I liked about the Versa-Pod bipod is the fact that you can remove it and put it back on with hardly any effect. The other reason is that you can tilt the rifle from side to side if need be, and the bipod stays in place. It has proven to be the best, most versatile bipod I have never used. Bipod To mount the Versa-Pod bipod all you need to do is just remove the barrel assembly, place the mounting adapter for the bipod as far forward to the front of the underside of the stock, center it on the stock, and with a center punch, make a index mark. Now, drill a hole through the stock where you made the index mark the same size as the mounting bolt, you will need to get a slightly longer bolt and if you can’t find one that is quite long enough. Just go with the one that is closest and you can use washers as spacers or shims. Then all you need to do is tighten up the bolt, but don’t tighten it to tight, or you could crack the stock. It is plastic... remember? One of the features that I liked about the Versa-Pod bipod is the fact that you can remove it and put it back on with hardly any effect. The other reason is that you can tilt the rifle from side to side if need be, and the bipod stays in place. It has proven to be the best, most versatile bipod I have never used. |
 Sling
As for the sling, you can go with just about any sling you want; it is really
up to you and what your personal preference is. There is an endless supply
of different types of slings out on the market today. I was not really concerned
with the sling, just wanted one that looked good, was of quality material
and built, no more then a 1-¼” in width, and adjustable. So, I went
to the local hunting store and find a black, 1” wide, adjustable, military-type
web nylon sling for about $10.00, it works just fine and looks sharp too.
Sling
As for the sling, you can go with just about any sling you want; it is really
up to you and what your personal preference is. There is an endless supply
of different types of slings out on the market today. I was not really concerned
with the sling, just wanted one that looked good, was of quality material
and built, no more then a 1-¼” in width, and adjustable. So, I went
to the local hunting store and find a black, 1” wide, adjustable, military-type
web nylon sling for about $10.00, it works just fine and looks sharp too.
Scope For the optics of the rifle, which is the most important part of any sniper weapon. Not saying that you can’t snipe without the scope, just you need some kind of sighting system on your rifle. The APS-2 SV does not have any iron sights on it like the APS-2 OR, which is like the Hunter Version of the Maruzen APS Series. I kept the same scope that I originally bought for the rifle which is the Leaper’s AccuShot Series Scope that www.tapco.com offers, and my choose for magnification was the 2.5x-10x with a objective diameter of 56mm.
The Leaper’s AccuShot Scopes are fairly cheap in price ranging from about $50.00 to $100.00, but they are very good, quality-built scopes. They have a one-piece tube, which makes it a stronger design, their lenses are multi-coated which helps reduce glare and gets a clearer view. They are nitrogen filled so they don’t fog up, they are waterproof, shock proof, and they come in a matte black finish. And best of all they have a lifetime guarantee. The reticle style is the standard Duplex with windage and elevation adjustments ¼” (1 click @ 100 yds.), a field of view 41’-10’ @ 100 yds. The scope is very light in weight only weighting 25.4 oz. with a length of 14.6”. You will need to get the 30mm rings because the tube diameter is 30mm; the APS-2 SV comes with a weaver-type mount already attached to it, so you don’t have the worry about finding a mount for it.
Big objective scopes allow more light to come in, which can cause glare problems. So the Leaper’s Sun Shade was a definite must have item for the scope which can be removed when there is low light, and put back on if the sun goes high and bright. I also equipped the scope with Quake Industries, Inc. Bushwacker Optic Len Covers that are available from www.quakeinc.com for about $8.00 a piece. These are flip-up lens covers that slip onto the ends of the scope and with a slight flip of your finger they pop open and up out of the way. You can get black lens covers or yellow lens covers; I would recommend the black lens covers.
Finished? Barry finally completed building the APS-2 SV “SHADOW” and called me to tell me he would be delivering it to me that evening, while on the telephone with me. He told me he fired 5 test rounds out of the rifle and they were the Maruzen .29g Grand Master BBs. He said, that the rifle was also quite hard to cycle the bolt, but I was expecting that with the 300% spring. He also said, that the trigger pull felt a little heavier and when the trigger finally did release the BB shot out and curved straight up almost instantly.
That evening when Barry delivered the rifle to me I decided that I would wait till I did the testing before I tried to cycle the bolt myself. I had prepared for the initial testing and had on hand varies weight BBs these included the Maruzen .29g Grand Master and Maruzen .3g BBs, along with Straight .36g Sniper Grade BBs and .43g BBs. I tried to get some .33g BBs, but was unable to locate any on-line retailer that had them in stock. I started with the Maruzen .29g Grand Master BBs first, loaded 25 rounds into the magazine and popped the mag into the rifle.
I figured that the scope would need to be zeroed, due to the fact it was removed from the rifle while it was going through the transformation, but I needed to see how the BBs were going to react to the new upgrades. So, zeroing the scope would have to wait for now. I set my targets up one at 100 ft., one at 150 ft. and another at 200 ft. with the mag loaded into the rifle and the rifle sitting on the bench rest. I reached for the bolt handle and with a smooth, easy upward motion I began to cycle the first round into the chamber. As Barry had stated on the telephone, the rifle was quite hard to cycle as I began to pull the bolt handle back and then forward again. This was no surprise to me as I had heard that the heavier springs like the 250%, 300%, and higher springs would make the rifle harder to cycle the bolt.
 The
first shots: I was in the sitting position at the bench rest
and I thought to myself that it was going to be a challenge to cycle the
bolt when I am in the prone position. But, that is the price I will have
to pay. I took careful aim at the center of the 100 ft. target, breathing
in deeply three times and on the last breath, I held and slowly squeezed
the trigger. I then knew what Barry was talking about the differences in
the trigger pull; it did seem to be a bit heavier. So, I release my breath
and again readied myself for the shot, knowing that my squeeze would need
to be adjusted to compensate for the new trigger feel. I took careful aim
at the target again, taking three breaths, and holding the last one I slowly
squeezed the trigger, and it released. Sending the Maruzen .29g Grand Master
BB, straight out and up as soon as it left the barrel. I was quite happy
with the silencer as it silenced the rifle rather nicely, you do still hear
the “tang” of the piston hitting, but it’s not that bad. Anyway, I again
cycled the bolt for the next shot still using the .29g BBs I wanted to give
each BB weight a decent chance, so I was going to fire at least one full
magazine of each weight of BBs. Well, the next and just about all the others
accept for a few shots that curved off to the side weren’t any better and
they went straight up as well.
The
first shots: I was in the sitting position at the bench rest
and I thought to myself that it was going to be a challenge to cycle the
bolt when I am in the prone position. But, that is the price I will have
to pay. I took careful aim at the center of the 100 ft. target, breathing
in deeply three times and on the last breath, I held and slowly squeezed
the trigger. I then knew what Barry was talking about the differences in
the trigger pull; it did seem to be a bit heavier. So, I release my breath
and again readied myself for the shot, knowing that my squeeze would need
to be adjusted to compensate for the new trigger feel. I took careful aim
at the target again, taking three breaths, and holding the last one I slowly
squeezed the trigger, and it released. Sending the Maruzen .29g Grand Master
BB, straight out and up as soon as it left the barrel. I was quite happy
with the silencer as it silenced the rifle rather nicely, you do still hear
the “tang” of the piston hitting, but it’s not that bad. Anyway, I again
cycled the bolt for the next shot still using the .29g BBs I wanted to give
each BB weight a decent chance, so I was going to fire at least one full
magazine of each weight of BBs. Well, the next and just about all the others
accept for a few shots that curved off to the side weren’t any better and
they went straight up as well.
Next, I popped the next magazine into the rifle it was loaded with Maruzen .3g BBs and it didn’t shoot any better with those BBs either. Pretty much the same as the .29g BB, straight up. So, after I fired all 25 of the .3g BBs I loaded the Straight .36g Sniper Grade BBs into the magazine. I was looking forward to seeing how these BBs would react to the new upgrades, as these were the BBs that I have been using in the rifle and find them to work the best. I popped in the freshly loaded mag into the rifle and slowly, easily cycled the bolt. I took careful aim at the 100 ft. target, taking three breaths; I held the last one and slowly squeezed the trigger. It released and out came the BB; I was quite surprised at the results. The .36g BBs shot out straight and went a little farther then the .29g and .3g BBs, but curved upward too. I would have bet that they would have been the ones that would shoot the straightest and farthest before dropping off. I fired off all 25 rounds just like I did with the .29g and the .3g BBs, but to no avail. I was hitting the target, but not the way I like and I didn’t plan on engaging any targets at 100 ft. or less. One of the reasons I upgraded the rifle in the first place was to get extended range and accuracy.
The only BBs I had left to test was the Straight .43g Sniper Grade BBs and I was hoping that they would be the ones that solved my problem. So, after I fired all of the .36g BBs out of the magazine I loaded up the .43g BBs in the hopes that they would be the ones. I again thought that it may be the scope that needed to be adjusted, but I decided to go ahead and test the .43g BBs anyway. With the freshly loaded magazine full of .43g BBs, I popped the mag into the rifle, slowly and easily I cycled the bolt and took my usual three breaths. Holding the last one I slowly squeezed the trigger, it released sending the .43g BB hurling down to the 100 ft. target. BAM! Hit the target, just to the left of the center mass where I was aiming. Whoa, what a relief I thought I was in big trouble if the .43g BBs didn’t work.
 Conditions were satisfactory, scope was zeroed @ 100 ft. |
Target practice: After, firing all 25 rounds of the .43g BBs and pretty much shedding the 100 ft. target I decided it was time to zero the scope, so I reloaded the magazine with the .43g BBs. Popped it into the rifle, went and set up a new target then set up to zero the scope. I positioned the rifle on the bench rest, took careful aim at the new 100 ft. target, dead center of the x10 ring, took in a breath, held it and slowly squeezed the trigger. It released sending the BB down to the target and hitting it about 3 inches to the left from where I was aiming.
I fired four more rounds at the target and they all hit just about the same place, so I adjusted windage to the right and again took aim. I again took aim at the center of the 100 ft. target, took a breath, and slowly squeezed the trigger. It released sending the BB down and right into the center x10 ring, right where I was aiming. After firing four more BBs into the 100 ft. target and pretty much hitting in the same area, I moved over to the 150 ft. target. I again took aim at the center of the x10 ring and took in a breath, slowly squeezing the trigger. It released, sending the BB down and into the 150 ft. target, just slightly to the bottom of the x10 ring where I was aiming.
 Compensated for 2 to 3 mph winds, blowing right to left. |
Not bad, that’ll work with no problem, so I set my sights on the 200 ft. target and again I took careful aim at the x10 ring, slightly holding the crosshairs just to the top of the center ring. I took in a breath, slowly squeezed the trigger and it released, sending the BB down to the 200 ft. target, hitting just to the left, lower part of the center ring where I was aiming. Again, not bad and I could compensate for a shot like that easy, so I fired four more rounds at the 200 ft. target, compensating for each shot till I hit right where I wanted too.
 Compensating for added distance & wind blowing 2 to 3 mph, right to left. Aiming points are indicated. |
Now, I decided to see if I could hit a target set out to 250 ft., definitely the farthest I have ever tried to shoot before with the rifle.So, I set up a target at 250 ft. and set up for a shot, taking careful aim, compensating as I did for the 200 ft. target, aiming slightly right and up a bit from the top of the center ring.
I took a breath and held it, slowly squeezed the trigger, the trigger released, sending the BB down to the 250 ft. target. It hit three to three an half inches below and to the left a bit from where I was aiming. The next four shots I tried to compensate for, but none of them were consistent. They still weren’t bad and I still would hit a man-sized target at that range. I figured that if I just kept it within the 220 to 230 ft. range, I wouldn’t have any problems hitting my intended target(s). So, with the initial testing and the scope zeroed in all was left was to be put through the combat test, an actual skirmish on the battlefield.
 Combat
tests: The day came for the actual combat test, it was a
bright sunny day about 60 to 65 degrees, few clouds, very light wind. The
team I am on decided to play CQB scenarios, so I was assigned to provide
security overwatch for the outer perimeter of the killhouse. Before we would
begin any game, we would need to clock the rifle and check to see what velocity
it was shooting at. The rifle chrono’d at 510 FPS with .29g BBs, with the
.36g BBs it shot 460 FPS and with the .43g BBs it was shooting 410 FPS.
Now with that out of the way and as long as I used BBs over .29g, I would
be able to use the rifle with no problem.
Combat
tests: The day came for the actual combat test, it was a
bright sunny day about 60 to 65 degrees, few clouds, very light wind. The
team I am on decided to play CQB scenarios, so I was assigned to provide
security overwatch for the outer perimeter of the killhouse. Before we would
begin any game, we would need to clock the rifle and check to see what velocity
it was shooting at. The rifle chrono’d at 510 FPS with .29g BBs, with the
.36g BBs it shot 460 FPS and with the .43g BBs it was shooting 410 FPS.
Now with that out of the way and as long as I used BBs over .29g, I would
be able to use the rifle with no problem.
So, moving on to the game, the killhouse is a two-story plywood building with three windows in the front of the second level, two windows and an entrance door in the front lower level. There is also an exit door at the lower rear of the building and a rooftop hatch that can be accessed from the second level. One side has two windows located in the second level, if you stood looking at the killhouse, they would be on the left-hand side. My job was to set up a shooting position in the front left-hand corner of the killhouse, this would allow me to cover all the opening of the building, and I would also cover the rooftop, in case the opposing team tried to put a shooter on top of the building.
Two assaulters were set up at the rear of the killhouse to provide security for the rear of the building. They would deal with any opposing team members trying to escape out the rear of the building. I decided to set up about 200 ft. out from the left-hand corner of the building, positioned behind a group of small trees. I used the trees as an aiming support to help steady my aim, I was in the standing position, this would make it easier for me to cycle the bolt.
Once I set up and the rear security was in place, the signal for the assaulting team was giving. They moved in on the right-hand side of the building and with radio commands I advised they of the situation. I could see two shooters in the No. #1 upper window, two shooters in the No. #3 upper window, and one shooter in each lower window. Rear security reported that they were taking fire from and returning fire to shooters on the rooftop. I was unable to see the rooftop shooters from my ground position, so the rear security team would have to deal with them.


Lead, advised me to eliminate any and all targets of opportunity, so with the order given of “Weapons free!” I took aim at my first target, which was one of the shooters in the No. #1 upper window. He was trying to look and see where the assaulting team was staging. I aimed for the upper part of his arm, as he was turned facing sideways of me. I began my breathing control, held my breath, slowly squeezed the trigger and with a light puff, send a BB slamming into the lower part of his arm, just below his elbow. With a surprised look on his face, he shakes his head and went out of sight. The second shooter was peeking out the window trying to see where the shot came from; I could hear him yelling to the others, that there was a sniper somewhere in the tree line.
The other shooters in the No. #3 upper window were firing suppressive fire into the tree line, but to no avail. I took my next target into sight, aiming dead center of his chest, taking a breath, holding, I slowly squeezed the trigger and sent a BB slamming into the mid-section of his torso. He too dropped out of sight and the other shooter jumped to the side of the window. I could just barely see him, so I took careful aim for the left-side of his chest, taking a breath, holding, slowly squeezing the trigger, I send a BB at him but it struck the wall behind him. So, he ducked to the other side of the window, out of sight, I quickly turned my attention to the lower windows and couldn’t see the shooters that I had seen before. I radioed the assaulting team and informed them that I had eliminated two shooters in the upper level, was unable to see the shooters in the lower level.
The rear security had eliminated one of the rooftop shooters, but not before the rooftop shooters had eliminated one of them. Lead, informed me to provide cover fire for them as they were going to begin their assault on the building and try to make entry. I advised him not to assault as the building was still heavily fortified, but he felt they could assault the building with minimum resistance. As the assaulting team made they way to the right side of the building, the remaining rooftop shooter had set up a position to the far right-hand corner of the rooftop. He popped up and opened fire on them as they tried to make it to the side of the building, hitting two of them and sending the remaining team members back into the cover of the trees. I then have a clear shot and focused on him, taking aim on the center of his back, I took a breath, held it, and slowly squeezed the trigger, sending a BB right into the lower part of his back. He dropped out of sight and I informed the remaining assault team that the threat was eliminated. Now with just three assault team members left, we would have to go with an aggressive entry, so I moved my position to cover just the front of the building, firing two to three rounds into each window. This was to let anyone in the rooms know I was still there and if they stuck their heads out for a look, I would pop them. I radioed the assault team to go and they went into action, eliminating the shooter through the window of the lower level, as I watched all the other openings. Once, they went inside it would be up to them, all I could do is watch for any movements from any of the openings.


