How
did I get hold of it?After getting my SG-1,
I decided I would get some sort of smaller GBB, as the
SG-1 is a pretty hefty rifle. I was enticed by an offer
from Airsoft Supplies for a KSC M11A1 at £85. Sadly,
as I was confirming the order, I was informed that the
firm had gone into liquidation. I was furious with myself
for letting such a good deal go by without getting one.
Within a few months I bought one from Airsoft Armouries
for £95. Not too bad. Unfortunately, the service was.
Over a month later, the M11A1 along with a spare mag
and the Tanio Koba Silencer arrived along with a FAMAS
that I ordered for a friend. As I opened the large cardboard
box, I was robbed of the thrill of sliding open the
M11A1 box, and admiring the beauty of it, as the gun,
along with everything else I ordered was strewn across
the bottom of the large cardboard box. After tiding
the box and equipment up, I found that a bag of BB's
I had also ordered was missing, but that's another story
(I never did get them, or the £10 they cost).
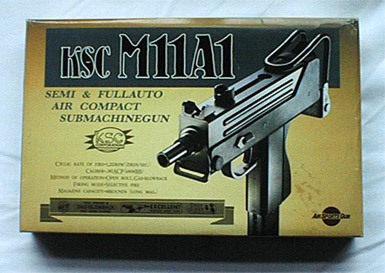
Box
Cover
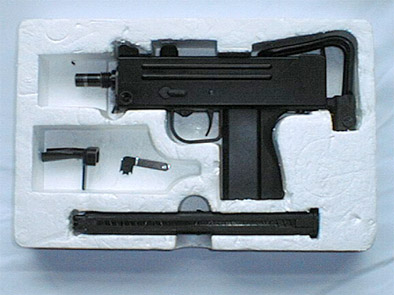
Box
interior: Notice the condition of the box, as
this is how it arrived with me.
First impressions Upon freeing the M11 from the jumble in
the box, I was startled at its weight. This is one heavy
piece of kit, even more so with the mag in. It is very
small (for a submachine gun), being about the same length
as a M9, perhaps a bit longer. As I examined it for
damage, I found that the gun was very realistic, as
the plastic receiver look metal from arm's length, and
was only confirmed as plastic when I touched it. I would
list the metal on the gun, but it's easier to list the
plastic. The plastic content consists of the upper and
lower receiver, hand-grip, mag well, bolt, sights, and
the receiver locking pin at the front of the gun.
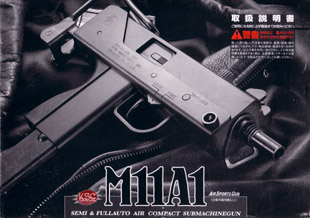
The
gun comes with, of course, a mag, a manual (which is
entirely in Japanese - pity, as there seems to be a
comprehensive data sheet on the real steel M11 and M10
family - but you do get the drift of what the manual
says through the pictures), along with an orange replacement
outer barrel. This can easily be exchanged for the metal
one, for countries when the law enforces barrel painting.
There is also a hop-up adjuster tool, a cardboard target
sheet and a mag-loading tool. I found this tool virtually
useless, as it continually clogs up after about 1-2
round go into the mag (I now use an electronic mag loader,
which is very useful).
When
holding the gun, I found that the grip and mag well
was too short to accommodate all of my hand, and my
little finger was left to grip onto the magazine. This
is of course a personal thing, and it may fit you perfectly.
By the way, I did find that the Desert Eagle was the
perfect size for my hand, so…
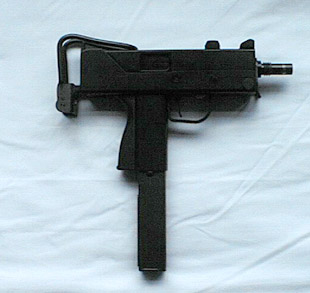
Left
Hand Side
Closer Inspection Working from front to back, the first part
we come to is the outer barrel. The outer barrel is metal,
but I am still unable to tell what type of metal it is.
My first thought was that it was the old Japanese Monkey
Metal, but it seems to be much better quality than some
of the metal that is visible elsewhere on the gun (see
later). The inner barrel of the gun is recessed into the
outer barrel by about 1 cm, therefore making it less visible.
There is mock rifling on the inside of the barrel, adding
to the realism. The thread on the barrel is the same as
other makes of M11 (namely, Maruzen), hence allowing use
of silencers made for the Maruzen M11. Secured between
the barrel and the receiver is a sling loop, for a fore-strap
(which is visible in the manual). This loop is secure,
but loose, so it can move freely, although it does get
in the way when you try to put the gun down on it's side,
as it rotates down, and prevents you from laying it flat.
This is not a problem with the gun or anything, it's just
is can get annoying. It can be removed quite easily by
dismantling the gun, if needed.
Right
Hand Side
The receiver
is ABS plastic with a black matt finish. The receiver
is in two parts. An upper part, which holds the bolt in
place and slots into the bottom part, which houses the
trigger mechanics. There is an abundance of markings on
the receiver. At the rear of the right hand side of the
gun is (what I believe to be) the Cobray logo. Forward
of that, beneath the ejector port, is written:
M11-A1
CAL .380
RPB INDUSTRIES, INC.
ATLANTA, GA. U. S. A.
About
the primary safety is written 'SAFE' and 'FIRE' in the
appropriate places. Yet further forward of this is where
a serial number maybe written. There is no serial number
on mine, yet the one on the manual does, as does other
M11A1's I have laid my eyes on. I don't know why this
is exactly, but It may e due to the following:
When
the M11A1's where first made, they were produced in
Japan, and were given unique serial numbers. After a
while, production was transferred to Taiwan, and the
serial numbers were no longer printed on the guns.
I
don't know if it's true, so don't quote me
The
left hand side of the receiver is devoid of marking
except for the 'S' and 'F' of the fire selector (See
later). On the lower receiver, there is a thin mould
line running the length of the gun. This isn't very
bad, and could be sanded down with a fine grade sandpaper.
What I did find annoying was that under the trigger
guard is a small mould 'notch', caused by the moulding
process, which is about 1 mm high. When I held the gun,
I found that this notch would rub against my middle
finger, and cause some discomfort in handling it. This
was simply remedied by lightly sanding the notch down
so that it would be flush with the rest of the trigger
guard.
There
is a KSC logo on the gun, and it can be found by rotating
the sling swivel upside down, and it can be seen, although
very small, under the barrel, on the upper receiver.
There is also a very small JASG logo at the base of
the magwell, beneath the trigger guard.
Holding
the two halves of the receiver together at the front
is a pin. The pin is in the form of an outer metal sheath,
and an inner plastic 'lock'. The plastic sheath can
be easily removed with the finger nail, while the metal
sheath on the other hand is a bit harder. When I first
tried to dismantle the gun, the metal sheath would not
move AT ALL. While trying to push the pin out, I felt
that the gun would break, and that there was something
holding the pin in place. After biting my lip, I pressed
harder, using the tip of a Biro to push on it, and the
pin came out. After removing and replacing the pin about
3-4 times, it gets easier to remove, but it will not
fall out during a skirmish. That I can be certain of.
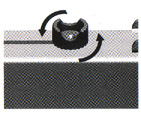
The
Cocking Handle
The
Movement of the Cocking Handle
*Images
taken from the M11A1 Manual, supplied with gun.
The
cocking handle is about 12mm high, made of metal (Monkey
Metal [MM] unfortunately) and forms a cylinder with
two semi-circular grooves cut out of the sides, so
that a line of sight is visible along the top of the
gun for aiming. This handle is located on the top
of the gun, and is attached directly to the bolt.
The handle fits through the top of the receiver via
a 1cm wide gap that runs about a third of the length
of the gun. When the gun is not cocked, the handle
is right at the front of the gap. When in this position,
it acts as a secondary safety (I will talk about the
primary safety later), as the handle can be rotated
through 90 degrees, and will prevent itself, and therefore
the bolt, from being pulled back, and cocked. When
acting as a safety, the line of sight for aiming is
blocked, showing that the bolt safety is applied.
When
the handle is in the cocked position, the handle is
only half way along the gap. This is normal, as the
other half of the gap is used during dismantling of
the gun. Apart from the cocked, and non-cocked positions,
there are two other positions that the handle can
be in (except for dismantling). These are about halfway
and three-quarters of the way between cocked and un-cocked.
When the gun is low on gas, the bolt will usually
catch on either on these positions. I haven't yet
figured out why they are there, apart from holding
the bolt partially open when the gun is low on gas.
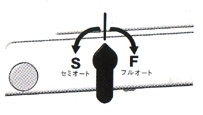
The
fire selector switch is on the left hand side of the
gun when holding it straight ahead, and is made of
MM. The switch can either point at S - single shot,
or F - full auto. It is rather sturdy, and, although
it can rotate 360 degrees, it clips into place firmly.
Fire
Selector Switch
*Images
taken from the M11A1 Manual, supplied with gun.
Primary
Safety Switch
*Images
taken from the M11A1 Manual, supplied with gun.
On the right hand side of the gun, is the Primary Safety. This is
also made out of MM, and is in the form of a triangle
(or for the picky [me], trapezium) slide switch. Sliding
the switch rearward engages the safety, and sliding
forward disengages it. For the right handed, the switch
can be easily moved, the lefties, the switch is a
little harder, but after a minute of practicing, it
can be done quite easily.
The safety acts as a trigger safety, allowing it to be enabled when
the gun is cocked, as well as un-cocked (unlike the
cocking handle). The trigger is a simple pivot type
made from, you guessed it, MM.
Hop-up
Adjustment
*Images
taken from the M11A1 Manual, supplied with gun.
The bolt is made of plastic, and must be in the cocked position before
the gun will fire (open-bolt). When the bolt is cocked,
it reveals the hop-up adjuster. The adjuster is simply
a plastic ring, with two notches on it. When the hop-up
adjustment tool is used, two teeth of the tool mesh with
the notches, and the ring is turned anti-clockwise/clockwise
depending on whether the hop-up is to be increased/decreased.
I haven't noticed the hop-up adjuster moving when in use,
even though it does seem to move rather freely during
adjustment.
The
mag release is a small, simple pull down lever at the
base of the back of the handgrip. When taking the mag
out, my instinct made me grab the mag with my left hand,
and pull the lever with my thumb, and then remove the
mag, in one easy movement. There is no temptation to
pull the lever and let the mag drop to the floor, as
it can't be done with the hand holding the gun. Good
news for the cost and damage conscious, but bad news
for the John Woo fans.
A
rather annoying point is when the mags are in the gun,
because they extend out of the bottom of the mag well,
the BB's can be seen from the front. It's nothing major,
and i'm being rather picky, but it does detract from
the realism of the gun
The
magazine is all metal, good quality metal at that, and
is matte black, like the receiver. The magazine makes
up about a third of the overall weight of the gun. There
is a hold down pin in the mag, keeping the spring compressed
without external pressure, allowing you to use boths
hand to fill the mag, without having to hold the spring
down. This also allows the blockback function to operate
normally, without throwing BB's out the barrel. Perfect
for maintainance. It can also be a pain, as once or
twice I have left the spring compressed, and then put
the gun away, unawares that the spring was in a compressed
state. Having said that, the mag springs haven't sufferd
because of this. The mags are said to jam when loaded
with the 68 rounds. I found this was true, so I only
fill my mags to about 66 rounds. Better safe than sorry.
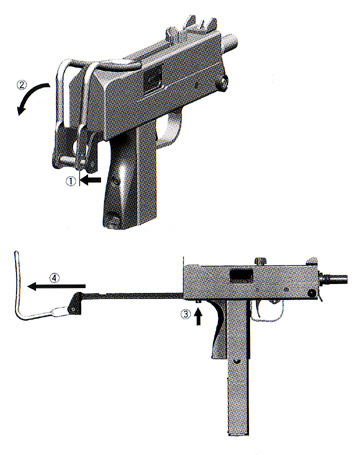
Stock
Operation
*Images
taken from the M11A1 Manual, supplied with gun.
Stock
Extended
The
stock. As yes, the stock. This hand me baffled for a
while, as I could not open it. The stock is made of
metal, but seems to be of the same quality as the outer
barrel (i.e., not MM). On the left hand side of the
stock is a smaller Cobray logo, similar to the one on
the receiver.
To
open the stock, firstly there is a loop of metal, which
acts as the end of the stock. This needs to be rotated
through 90 degrees, before the stock can be extended.
This is what had me stumped. To rotate it, you have
to press the two ends of the metal loop together, as
if like a large set of tweezers. This allows a notch
on the loop to move free from a small pin, holding the
loop in the stored position. Once folded down, it again
locks in place, and requires pressing again to release
it. Once in the unfolded position, there is a button
under the lower receiver at the rear of the gun. While
pressing this button, the stock can be slid out, and
once the stock is moving, release the button, and it
will lock into place. If the button is kept depressed,
the entire stock can be removed. It can be replaced
later, by depressing the button again, and sliding the
stock back in.
Being
me, I didn't look at the manual straight away, and felt
a bit of an idiot when I saw the explanation in two
picture, seen right.
When
in the open position, the stock doubles the length of
the gun (with the silencer the gun is three times longer!).
The stock isn't very sturdy, and there is quite a bit
of wobble with it. Also, when trying to aim with the
stock out, it is very uncomfortable for the neck (this
might be because I'm 6'3")
How
does it perform? Being a collector, I haven't used
it in the field, so I am unable to say how it functions
in combat. I can however say how it functions in my
back garden. I use American Eagle gas, which is a mixture
of HFC22 and HFC134a. I found, to my astonishment, that
a full mag of gas lasted a full 8 mags worth of BB's,
and showed no signs of cool down. On the subject of
cool down, you only really notice it on the last 10
shots, and it only really affects the last five rounds.
When this happens, the bolts seems to move only halfway
to the cocked position, and with the last shot (from
the gas - this does not happen with the last shot from
every mag, only with the last shot from a given fill
of gas), it bounces back and forth until it stops about
1-2 seconds later. From what I can tell, this does no
damage to the gun. The range of the gun is at least
20-30 metres (the length of my garden) with AE gas,
at just below room temperature. With HFC134a, I found
the range to be only slightly lower, although it affected
by temperature a lot more than AE gas is.
I
found that the gun was able to empty the mag (66 rounds) in
little over 2 seconds; roughly 30 rounds a second.
I
find the gun a very well build piece, and I would recommend
it to anyone who wants a bit of fun. As a practical skirmishing
weapon, I think you should give it a miss, unless you have
lots of mags, and don't mind the weight. I have heard rumours
of the bolt shattering, but I have yet to see/hear anything
to prove it. Apart from that, it is a fantastic weapon. There
is a huge array of silencers available, as well as metal bodies,
bolts, upgrade valves etc. As a collector, I cannot see me
getting rid off it for the foreseeable future; in fact, all
I have to do now, I save up for a second!