TOP M60DX
by Aussy Murphy
Stock Specifications
FPS 280m/s (stock fps may vary)
Length: 1100mm
Barrel Length:  ?
Weight: 5200g

Ammo capacity:

1200 rounds

TOP


Background

Reasons to purchase an M60: If you want attention on the airsoft field, the M60 “Pig” will give you just that!  Its intimidating looks and distinctive sound has psychological impact that exceeds greatly its actual capacity as an airsoft weapon.  In stock form it’s a heavy, awkward, long rifle that doesn’t shoot any harder, farther or more rapidly than a stock Tokyo Marui AEG.  It holds 1200 rounds which it can fire non stop at about 260 FPS with 20 gram.  Compared to players equipped with hi-cap magazines there’s really not much upside!  Fortunately our local team emphasizes true Mil Sims and focuses on realism as much as possible.  We insist on low caps for all but the Squad Automatic gunners or designated Crew Served weapons.  We require players using Hi-caps to have a bipod on their weapon and an oversized magazine so they can be readily identified on the field and experience some limitations.  In this environment, the high fire power, engine burning performance, and trigger to the metal shooting justify the M60.  Even so, after several games we felt the M-60 in stock form just wasn’t adequate to justify its heavy weight of 18 lbs, (roughly half that of a real one) but still awkward for airsoft.  We asked around about upgrades and were told that there were kits but were advised against trying to do it ourselves.   After searching all over the Internet we couldn’t find any guidance on how to do the modification.  Everyone said not to attempt it as the TOP design is complex and intricate compared to a regular AEG.

Disaster: Our M60 experience was a nightmare from the get go.  Our original ordered “60” from Taiwan was seized at LAX for quite some time and we began to think we’d never see it.  We dumped the dough on the more expensive M60 DX.  We liked the adjustable bi pod legs, additional use of real metal and more detailed parts.  Once it appeared our original order wasn’t going to arrive, in our hurry to get an M-60 we turned to E-bay.  We bid a used M60 and when no one else bid it, we got it dirt cheap.  This was just the standard model which needed some TLC so it was nothing too special.  Unfortunately the person we bought this one from was slow with responses and it took about a month and a half to get the gun.  Of course, during this period, the M60 DX that was seized was released from Customs, so we now had two M60’s.  We fixed up the used one we bought doing the necessary repairs and improving its appearance and sold the base version on Ebay.

We put actual M-60 slings on both and mounted the side with an actual M-60 bandoleer and string of dummy rounds which made both look considerably better. We did quite well with the sale of our surplus M-60 and our buyer is delighted with the gun last we heard.  We would have loved to have 2 for the team but just couldn’t justify it.  Neither of us looks enough like Sylvester Stalone!

About the TOP M60: The M60 is a very sturdy and heavy replica.  Of course, the airsoft version of the M60 is about half the weight of the real thing.  So my dad (who was a ranger in the Army) won’t let me complain about it being too heavy to lug around (and proceeds to makes fun of anyone else on the team who does.)  There are several metal parts; the only parts that really aren’t metal are the front fore grip, the pistol grip, and the stock.  The pistol grip and the stock are both fine, but the front fore grip is really plasticy and can tend to crackle while hauling the gun around.  Solution: as always, duct tape (the Red Green show is like a religion to me.)  Dad says they did this in the Army as well as taping the slings to cut down on rattle so doing so doesn’t cut down on authenticity at all.

Firing the M60 is quite fun, it has an impressive rate of fire and reasonable velocity.  While the rate of fire is awesome, the velocity is slightly less than that of your average stock Tokyo Marui AEG (about 260 fps.)  For this weapon to match its intimidating looks and justify its weight my dad and I decided  when it jammed again to dump the dough that we made from selling the one M60 towards upgrading the other.

The final decision was made when our M60 stopped firing.  Either way I had to go into it.  I had to unjam it once because my dad (genius that he is) thought, well instead of upgrading it, let’s just put .12 gram BB’s in it!  That will give it a higher velocity and most likely the range.  Since it was used in suppression role it wouldn’t need accuracy…

WARNING! 12 Gram BBs should never be used in a TOP BB gun.  It jammed BB’s from an inch into the barrel all the way to the loading mechanism.  Just to unjam it, I essentially had to strip it half way down.  The TOP barrel takes a “z” shaped turn so it’s not just a case of using a rod to unjam it. It was fixed for now and my confidence was boyed by the fact that I could take it apart and put it back together. 

The next time it jammed the problem was more involved.  The loading mechanism wasn’t working.  I knew I’d have to open this gun up once again.  At this, dad decided to invest in a full upgrade.  (Something I wanted to do all along!)  
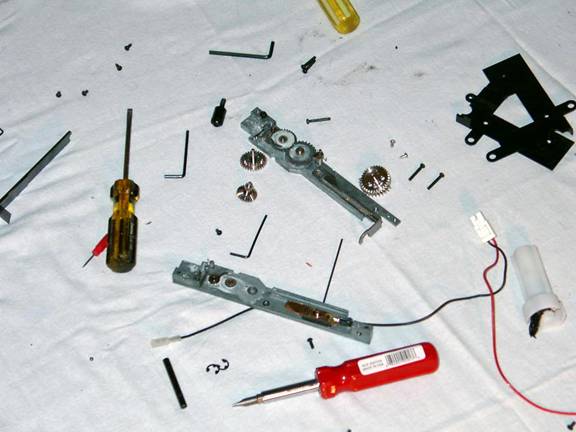
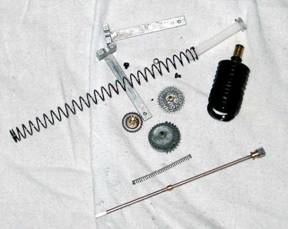
We purchased the Angs cylinder, Angs spring guide, Angs 1 joule spring, and an entire gear set replacement for the main gear system (If you didn’t know, there are two different gear sets, one for controlling the spring and cylinder, the other for the loading mechanism.)  The total cost in parts was about $240.00.  
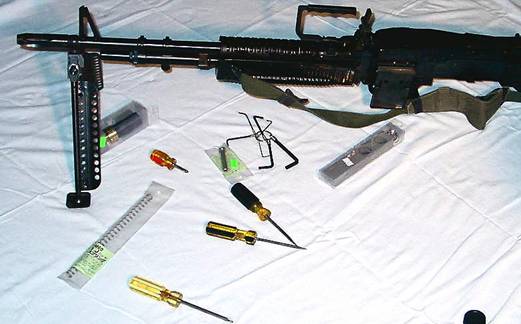
As I said it’s a complex design.

Upgrading

Important Advice: Let me just start off by telling you that this is not a fun gun to take apart.  Some argue that it is the hardest airsoft gun to work on.   Comparing it to my P-90 is like comparing a cabin on the lake to the Winchester mansion!  What I recommend is that you set aside an entire day to do this operation. Lay everything out on a white sheet so you won’t lose any parts.  It took me about 6 hours to take the M60 apart and back together again.  This was primarily because my pig was the first gun that I’ve ever upgraded and because I had no guide on how to do it.  The instructions on the upgrade kit had a few pictures (hard to see) and all the instructions are in Kanji!   There are a ton of parts and when it’s totally taken apart, you can’t even tell it’s a replica weapon.  If you do half of it one day, and the other half another day, chances are you won’t be able to pick up where you left off cause you won’t remember where all the screws go, and what the heck each thing does.  To make a long story short, your pig will become bacon grease and pork chops.  I’m sure that many a TOP M-60 is lying in parts somewhere in garages all over the world.

What you need:Things that you need to do this operation are as follows:

  • Patience and a steady hand! 
  • A Phillips and flathead screw driver (preferably ones that are long and skinny and have a pretty sharp head)
  • A hex wrench set with the smallest hex wrench you’ll ever find, (one conveniently comes with the Angs Cylinder set,)
  • A pair of pliers
  • A pair of tweezers
  • A star shaped screw head with a hole in the middle. On the wrapper there’s the letters TX10 and it says that it’s a ¼” (6.4mm) size.  It’s a very obscure tool took several trips to the hardware store and is absolutely essential.
  • Also, you’ll need some of the special greases for the gears and the cylinder, as well as any parts that you will be installing.

Taking it Apart: *This guide is specific for the M60 DX version and I don’t know how different the other variants are.*

Ok, now that that’s said and done, let’s get started.  Obviously put it on safe, 

Unload the gun and disconnect the battery.  
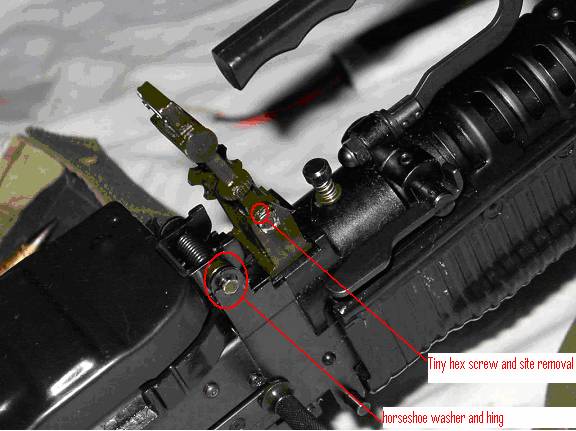
You have to start off with removing the rear sight.  Do this by tightening the adjustment screw until a bolt sticks out and it exposes a little hole.  
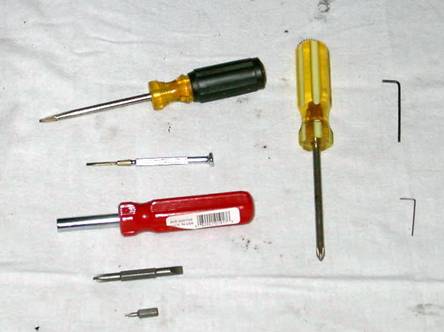
Use your tiny hex wrench and unscrew that tiny thing.  Remove the nut and unscrew the adjustment screw using a flathead screw driver on the opposite side.  Lift out the top portion of the sight.  Then remove the gold thing and the spring below it.  This will expose a screw, unscrew it.  Slide the rest of the sight out to the side.  
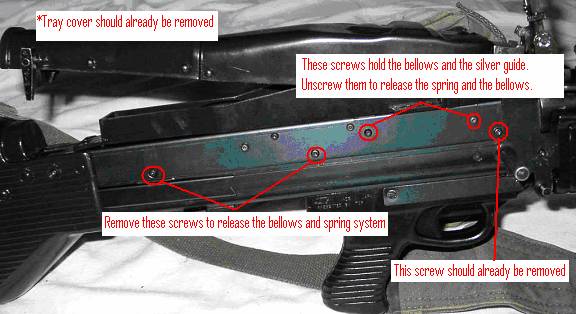
Next comes the tray cover.

Take some tweezers and remove the horseshoe clips located on one of the sides of the joint.  NOTE: Careful, these things fly and are nearly impossible to find!  Slide the rod out from the joint.  The tray cover will now be free to remove.

Next is the actual tray that holds the bb’s.  Unscrew the four screws located on around the golden barrel thingy.  Also, unscrew the screw that holds the springy thingy to the golden barrel thingy (notice how technical my terms are.) Then lift out the golden barrel thingy.  Remove the last screw in the back of the tray (located just in front of the hole that locks the tray in place.  Finally, remove the thing that holds the magazine bag.  Lift out the tray. Now you have the bellows and spring exposed.

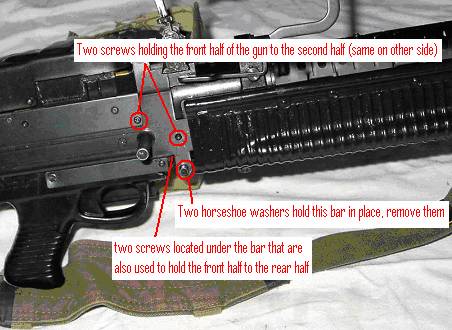
Next you will remove the front half of the gun.  Unscrew the 2 screws located under where the site was on sides of the gun.  Then turn the Pig on its back and remove the rod located on the bottom (made for use on a tripod.) This rod is also held in place using horse shoe washers.  This time you must remove both of them and once again, be careful!  Once the rod is removed, two hex screws are revealed.  Unscrew them.  Then take a larger hex wrench and remove the hex screw located just in front of the trigger.  Now the front half of the gun is free to slide off.  Proceed to remove the front half of the gun.

The bellows and spring will now be removed.  Unscrew the bottom two screws located on the bottom row of screws.  Do the same thing on the other side.  Now the bellows system and the spring portion will lift out.  Unscrew these two screws on the portion you just lifted out.  Now the two silver bars that stabilize the bellows system are loose and will slide out.  The spring will come out with the spring guide as well (careful, it can launch.)

Now you must assemble and install the new spring and the cylinder that replaces the bellows.  First you have to remove the front part of the bellows system, and use the back portion with the guides.  Do this by removing the metal bar that holds the bellows in place and keeps the upper portion connected to the back.  (Don’t think you can just cut the wide portion from the thin portion, you’ll see why after you take it apart.) 

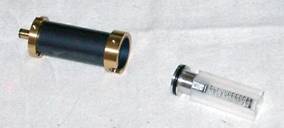
Once you have this done, attach the piston to the piston head and use the same bar that held the piston to the bellows system together to hold the piston head to the piston.  Put on the rubber ring that came with the cylinder set on the piston head and two on the cylinder itself.  Add the grease to the cylinder and it’s mechanism to ensure a smooth action. 

Assembling this part is slightly different than disassembling it.  You won’t use the silver bars used for the bellows system to hold it in place.  Instead, you will bolt the cylinder directly to the frame.  Be sure to put the piston into the cylinder before you screw it in.  Also, use the screws that came with the new cylinder and put them in the front two holes that hold the cylinder in place.  Next put in the new spring and the new spring guide.

Next you have a crossroads, if you are not planning on replacing the gears; you are done and can now reassemble the gun.  If you plan on continuing and replacing the gears, you’ve got more to do!

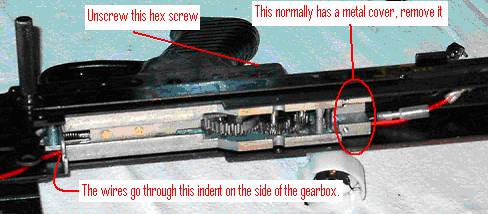
Your final thing to do is the most annoying.  Start off by removing the stock.  Unscrew the four screws located on both sides of the stock. Then remove the large screw in the back.  The stock with slide off and expose the motor and fuse.

Unscrew the cover with the loading mechanism and remove this plastic cover.  This holds the second gear system that turns the loading mechanism. Now remove the thin metallic piece that goes around the long metal rod running from the motor to the gearbox.  

Now that the gear box is totally exposed, unscrew the two screws located in the back of the gear box. Unscrew the two screws that hold the motor into place located in front of the motor and on the left side of the gun.  Lift the motor out.  If you have a gear replacement set, you will replace the long rod.  (You must keep the spring and the smaller gear that drives the loading mechanism.)  Next, you must unscrew the large hex screw located behind the pistol grip as well as the screw behind that.  Now, lift out the gearbox (careful of the spring for the charging handle.)  Remove the screws that hold the gearbox together and open it in half.  Add grease appropriately (a light film) and insert the gears into the correct place.  I also thought it was best to keep the teeth of the gear that pulls back the piston facing down.  This puts the gears in the correct position. If they are not like this then your gears will be set to pull the piston back when it’s already back.  This could strip your gears (If you test fire it while reassembling it, be sure that before you assemble the piston, spring and cylinder portion that you have the teeth of the thick gear facing down.) When putting the gear box back into place, the wires must be put on the thin indent on the side of the gearbox.


Left over parts

Time for the hard part, putting it back together.  For the most part, you can reassemble the gun by reading these instructions backwards, but some things to keep in mind are to not to over tighten screws.  Tight is good but not to a point where if you try and loosen them, they’ll strip. 

Also, while reinstalling the motor, you must use a lot of test and error as to the correct length that the rod will stick out of the motor.  There’s a bearing near the gear at the end of the rod that sticks out of the motor, be sure that this fits correctly in the gear box.

The rest should be pretty simple.  Don’t forget to place the inner barrel in right side up so the hop up screw will function.  Remember, after different sections are installed and secured; be sure to test the mechanism and double check that everything is working correctly (plug in a battery and give it a few test fires.)  Just a heads up, don’t be surprised if you forget to install something and have to go back and correct it.

Results: Once it’s all together remember that even once loaded the M-60 takes a while for the BB tube to prime.  The initial firing sequence after loading requires several bursts before BBs are funneled up to the chamber.  Don’t panic when this happens.  I did!  After the gun started firing, let me say that the results were EXCELLENT!  The velocity had definitely been improved it probably shoots at a solid 330 FPS. Significantly better then when stock.  The gun is even louder and more intimidating because it now uses a cylinder instead of a bellows system.  Now it sounds like a vacuum cleaner sucking up nails instead of a dirt devil.  The accuracy isn’t exactly the best feature of the gun, (should have put in a custom barrel)   but that doesn’t seem to matter much since this gun is meant to make heads duck and create a large beaten zone.  My dad is shocked that I got it back together with only a few parts left over ( a mystery screw and washer) and just a few bruised knuckles.  Oh well you can’t make an omelet without breaking a few eggs.  I can’t wait to wallow in the mud with this Pig on the next skirmish. 

I will update this review with information on skirmishing with then newly upgraded gun as soon as possible.

Comment on this review in the forums


Last modified: Sunday, May 18, 2003 7:54 PM Copyright 2003 ArniesAirsoft